- жөҸи§Ҳ: 748488 ж¬Ў
-

ж–Үз« еҲҶзұ»
зӨҫеҢәзүҲеқ—
- жҲ‘зҡ„иө„и®Ҝ ( 0)
- жҲ‘зҡ„и®әеқӣ ( 0)
- жҲ‘зҡ„й—®зӯ” ( 0)
еӯҳжЎЈеҲҶзұ»
- 2012-03 ( 6)
- 2012-02 ( 112)
- 2012-01 ( 11)
- жӣҙеӨҡеӯҳжЎЈ...
жңҖж–°иҜ„и®ә
-
bzhaoпјҡ
дҪ з”ЁжңҖе°Ҹзҡ„дҫӢеӯҗжҠҠVPATH иҜҙжҳҺзҷҪдәҶпјҒ
MakefileдёҚж”ҜжҢҒVPATHзҡ„й—®йўҳ -
qingfeng200468пјҡ
гҖҗ2 + 3зҡ„йҖҶжіўе…°иЎЁзӨәжі•дёә+ 2 3гҖӮгҖ‘иҝҷеҸҘеҶҷй”ҷдәҶпјҢеә”иҜҘжҳҜжіў ...
йҖҶжіўе…°иЎЁиҫҫејҸ
Androidеә”з”ЁзЁӢеәҸй”®зӣҳпјҲKeyboardпјүж¶ҲжҒҜеӨ„зҗҶжңәеҲ¶еҲҶжһҗпјҲдәҢпјү
дёҠжҺҘпјҡAndroidеә”з”ЁзЁӢеәҸй”®зӣҳпјҲKeyboardпјүж¶ҲжҒҜеӨ„зҗҶжңәеҲ¶еҲҶжһҗпјҲдёҖпјү
-----
2.еә”з”ЁзЁӢеәҸжіЁеҶҢй”®зӣҳж¶ҲжҒҜжҺҘ收йҖҡйҒ“зҡ„иҝҮзЁӢеҲҶжһҗ
InputManagerеҗҜеҠЁд»ҘеҗҺпјҢе°ұејҖе§ӢиҙҹиҙЈзӣ‘жҺ§й”®зӣҳиҫ“е…ҘдәӢ件дәҶгҖӮеҪ“InputManagerзӣ‘жҺ§еҲ°й”®зӣҳиҫ“е…ҘдәӢ件时пјҢе®ғеә”иҜҘжҠҠиҝҷдёӘй”®зӣҳдәӢ件еҲҶеҸ‘з»ҷи°Ғе‘ўпјҹеҪ“然жҳҜиҰҒжҠҠиҝҷдёӘй”®зӣҳж¶ҲжҒҜеҲҶеҸ‘з»ҷеҪ“еүҚжҝҖжҙ»зҡ„ActivityзӘ—еҸЈдәҶпјҢдёҚиҝҮпјҢеҪ“еүҚжҝҖжҙ»зҡ„ActivityзӘ—еҸЈиҝҳйңҖиҰҒдё»еҠЁжіЁеҶҢдёҖдёӘй”®зӣҳж¶ҲжҒҜжҺҘ收йҖҡйҒ“еҲ°InputManagerдёӯеҺ»пјҢInputManagerжүҚиғҪжҠҠиҝҷдёӘй”®зӣҳж¶ҲжҒҜеҲҶеҸ‘з»ҷе®ғеӨ„зҗҶгҖӮйӮЈд№ҲпјҢеҪ“еүҚиў«жҝҖжҙ»зҡ„ActivityзӘ—еҸЈеҸҲжҳҜд»Җд№Ҳж—¶еҖҷеҺ»жіЁеҶҢиҝҷдёӘй”®зӣҳж¶ҲжҒҜжҺҘ收йҖҡйҒ“зҡ„е‘ўпјҹеңЁеүҚйқўдёҖзҜҮж–Үз« Androidеә”з”ЁзЁӢеәҸеҗҜеҠЁиҝҮзЁӢжәҗд»Јз ҒеҲҶжһҗдёӯпјҢжҲ‘们еҲҶжһҗAndroidеә”з”ЁзЁӢеәҸзҡ„еҗҜеҠЁиҝҮзЁӢж—¶пјҢеңЁStep 33дёӯеҲҶжһҗеҲ°ActivityThreadзұ»зҡ„handleLaunchActivityеҮҪж•°дёӯпјҢжҲ‘们жӣҫз»ҸиҜҙиҝҮпјҢеҪ“еҮҪж•°handleLaunchActivityи°ғз”ЁperformLaunchActivityеҮҪж•°жқҘеҠ иҪҪиҝҷдёӘе®ҢжҜ•еә”з”ЁзЁӢеәҸзҡ„й»ҳи®ӨActivityеҗҺпјҢеҶҚж¬ЎеӣһеҲ°handleLaunchActivityеҮҪж•°ж—¶пјҢдјҡи°ғз”ЁhandleResumeActivityеҮҪж•°жқҘдҪҝиҝҷдёӘActivityиҝӣе…ҘResumedзҠ¶жҖҒгҖӮеңЁи°ғз”ЁhandleResumeActivityеҮҪж•°зҡ„иҝҮзЁӢдёӯпјҢActivityThreadдјҡйҖҡиҝҮandroid.view.WindowManagerImplзұ»дёәиҜҘActivityеҲӣе»әдёҖдёӘViewRootе®һдҫӢпјҢ并且дјҡйҖҡиҝҮи°ғз”ЁViewRootзұ»зҡ„setViewжҲҗе‘ҳеҮҪж•°жҠҠдёҺиҜҘActivityе…іиҒ”зҡ„Viewи®ҫзҪ®еҲ°иҝҷдёӘViewRootдёӯеҺ»пјҢиҖҢActivityжӯЈжҳҜйҖҡиҝҮViewRootзұ»зҡ„setViewжҲҗе‘ҳеҮҪж•°жқҘжіЁеҶҢй”®зӣҳж¶ҲжҒҜжҺҘ收йҖҡйҒ“зҡ„гҖӮ
жңүдәҶиҝҷдәӣиғҢеҪұзҹҘиҜҶеҗҺпјҢжҺҘдёӢжқҘпјҢжҲ‘们е°ұеҸҜд»Ҙд»ҺViewRoot.setViewеҮҪж•°ејҖе§ӢеҲҶжһҗеә”з”ЁзЁӢеәҸжіЁеҶҢй”®зӣҳж¶ҲжҒҜжҺҘ收йҖҡйҒ“зҡ„иҝҮзЁӢдәҶгҖӮйҰ–е…ҲзңӢдёҖдёӢиҝҷдёӘжіЁеҶҢиҝҮзЁӢзҡ„еәҸеҲ—еӣҫпјҢ然еҗҺеҶҚиҜҰз»ҶеҲҶжһҗжҜҸдёҖдёӘжӯҘйӘӨпјҡ
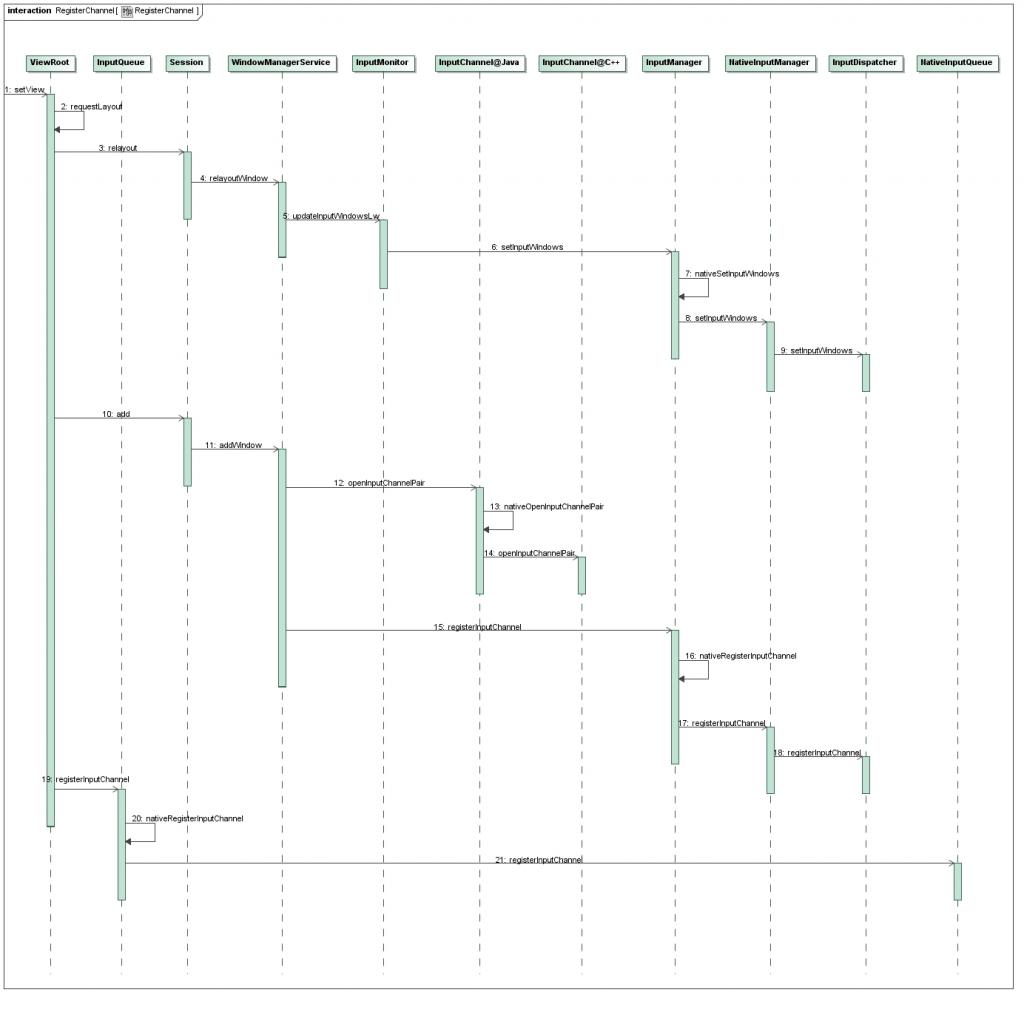
Step 1. ViewRoot.setView
иҝҷдёӘеҮҪж•°е®ҡд№үеңЁframeworks/base/core/java/android/view/ViewRoot.javaж–Ү件дёӯпјҡ
- publicfinalclassViewRootextendsHandlerimplementsViewParent,
- View.AttachInfo.Callbacks{
- ......
- publicvoidsetView(Viewview,WindowManager.LayoutParamsattrs,
- ViewpanelParentView){
- ......
- synchronized(this){
- if(mView==null){
- ......
- //Schedulethefirstlayout-before-addingtothewindow
- //manager,tomakesurewedotherelayoutbeforereceiving
- //anyothereventsfromthesystem.
- requestLayout();
- mInputChannel=newInputChannel();
- try{
- res=sWindowSession.add(mWindow,mWindowAttributes,
- getHostVisibility(),mAttachInfo.mContentInsets,
- mInputChannel);
- }catch(RemoteExceptione){
- ......
- }finally{
- ......
- }
- ......
- if(viewinstanceofRootViewSurfaceTaker){
- mInputQueueCallback=
- ((RootViewSurfaceTaker)view).willYouTakeTheInputQueue();
- }
- if(mInputQueueCallback!=null){
- mInputQueue=newInputQueue(mInputChannel);
- mInputQueueCallback.onInputQueueCreated(mInputQueue);
- }else{
- InputQueue.registerInputChannel(mInputChannel,mInputHandler,
- Looper.myQueue());
- }
- ......
- }
- }
- }
- }
иҝҷдёӘеҮҪж•°дёӯдёҺжіЁеҶҢй”®зӣҳж¶ҲжҒҜжҺҘ收йҖҡйҒ“пјҲInputChannelпјүзӣёе…ізҡ„йҖ»иҫ‘дё»иҰҒжңүдёүеӨ„пјҢдёҖжҳҜи°ғз”ЁrequestLayoutеҮҪж•°жқҘйҖҡзҹҘInputManagerпјҢиҝҷдёӘActivityзӘ—еҸЈжҳҜеҪ“еүҚиў«жҝҖжҙ»зҡ„зӘ—еҸЈпјҢдәҢжҳҜи°ғз”ЁsWindowSessionпјҲWindowManagerServiceеҶ…йғЁзұ»Sessionзҡ„иҝңзЁӢжҺҘеҸЈпјүзҡ„addжҲҗе‘ҳеҮҪж•°жқҘжҠҠй”®зӣҳж¶ҲжҒҜжҺҘ收йҖҡйҒ“зҡ„дёҖз«ҜжіЁеҶҢеңЁInputManagerдёӯпјҢдёүжҳҜи°ғз”ЁInputQueueзҡ„registerInputChannelжҲҗе‘ҳеҮҪж•°жқҘжҠҠй”®зӣҳж¶ҲжҒҜжҺҘ收йҖҡйҒ“зҡ„еҸҰдёҖз«ҜжіЁеҶҢеңЁжң¬еә”з”ЁзЁӢеәҸзҡ„ж¶ҲжҒҜеҫӘзҺҜпјҲLooperпјүдёӯгҖӮиҝҷж ·пјҢеҪ“InputManagerзӣ‘жҺ§еҲ°жңүй”®зӣҳж¶ҲжҒҜж—¶пјҢе°ұдјҡе…ҲжүҫеҲ°еҪ“еүҚиў«жҝҖжҙ»зҡ„зӘ—еҸЈпјҢ然еҗҺжүҫеҲ°е…¶еңЁInputManagerдёӯеҜ№еә”зҡ„й”®зӣҳж¶ҲжҒҜжҺҘ收йҖҡйҒ“пјҢйҖҡиҝҮиҝҷдёӘйҖҡйҒ“еңЁInputManagerдёӯзҡ„дёҖз«ҜжқҘйҖҡзҹҘеңЁеә”з”ЁзЁӢеәҸж¶ҲжҒҜеҫӘзҺҜдёӯзҡ„еҸҰдёҖз«ҜпјҢе°ұжҠҠй”®зӣҳж¶ҲжҒҜеҲҶеҸ‘з»ҷеҪ“еүҚжҝҖжҙ»зҡ„ActivityзӘ—еҸЈдәҶгҖӮ
еңЁжҺҘдёӢжқҘзҡ„еҶ…е®№дёӯпјҢжҲ‘们йҰ–е…ҲжҸҸиҝ°requestLayoutеҮҪж•°жҳҜеҰӮдҪ•е‘ҠиҜүInputManagerеҪ“еүҚзҡ„ActivityзӘ—еҸЈдҫҝжҳҜжҝҖжҙ»зӘ—еҸЈзҡ„пјҢжҺҘзқҖеҶҚеӣһиҝҮеӨҙжқҘеҲҶжһҗеә”з”ЁзЁӢеәҸжҳҜеҰӮдҪ•жҠҠй”®зӣҳж¶ҲжҒҜжҺҘ收йҖҡйҒ“зҡ„дёҖз«ҜжіЁеҶҢеҲ°InputManagerдёӯеҺ»зҡ„пјҢжңҖеҗҺеҲҶжһҗеә”з”ЁзЁӢеәҸжҳҜеҰӮдҪ•й”®зӣҳж¶ҲжҒҜжҺҘ收йҖҡйҒ“зҡ„еҸҰдёҖз«ҜжіЁеҶҢеҲ°жң¬еә”з”ЁзЁӢеәҸзҡ„ж¶ҲжҒҜеҫӘзҺҜдёӯеҺ»дәҶгҖӮ
Step 2.ViewRoot.requestLayout
иҝҷдёӘеҮҪж•°е®ҡд№үеңЁframeworks/base/core/java/android/view/ViewRoot.javaж–Ү件дёӯпјҡ
- publicfinalclassViewRootextendsHandlerimplementsViewParent,
- View.AttachInfo.Callbacks{
- ......
- publicvoidrequestLayout(){
- ......
- mLayoutRequested=true;
- scheduleTraversals();
- }
- ......
- }
Step 3.WindowManagerService.Session.relayout
иҝҷдёӘеҮҪж•°е®ҡд№үеңЁframeworks/base/services/java/com/android/server/WindowManagerService.javaж–Ү件дёӯпјҡ
- publicclassWindowManagerServiceextendsIWindowManager.Stub
- implementsWatchdog.Monitor{
- ......
- privatefinalclassSessionextendsIWindowSession.Stub
- implementsIBinder.DeathRecipient{
- ......
- publicintrelayout(IWindowwindow,WindowManager.LayoutParamsattrs,
- intrequestedWidth,intrequestedHeight,intviewFlags,
- booleaninsetsPending,RectoutFrame,RectoutContentInsets,
- RectoutVisibleInsets,ConfigurationoutConfig,SurfaceoutSurface){
- //Log.d(TAG,">>>>>>ENTEREDrelayoutfrom"+Binder.getCallingPid());
- intres=relayoutWindow(this,window,attrs,
- requestedWidth,requestedHeight,viewFlags,insetsPending,
- outFrame,outContentInsets,outVisibleInsets,outConfig,outSurface);
- //Log.d(TAG,"<<<<<<EXITINGrelayoutto"+Binder.getCallingPid());
- returnres;
- }
- ......
- }
- ......
- }
иҝҷдёӘеҮҪж•°еҸӘжҳҜз®ҖеҚ•ең°и°ғз”ЁWindowManagerServiceзҡ„жҲҗе‘ҳеҮҪж•°relayoutWIndowжқҘиҝӣдёҖжӯҘеӨ„зҗҶгҖӮ
Step 4.WindowManagerService.relayoutWIndow
иҝҷдёӘеҮҪж•°е®ҡд№үеңЁframeworks/base/services/java/com/android/server/WindowManagerService.javaж–Ү件дёӯпјҡ
- publicclassWindowManagerServiceextendsIWindowManager.Stub
- implementsWatchdog.Monitor{
- ......
- publicintrelayoutWindow(Sessionsession,IWindowclient,
- WindowManager.LayoutParamsattrs,intrequestedWidth,
- intrequestedHeight,intviewVisibility,booleaninsetsPending,
- RectoutFrame,RectoutContentInsets,RectoutVisibleInsets,
- ConfigurationoutConfig,SurfaceoutSurface){
- ......
- synchronized(mWindowMap){
- ......
- mInputMonitor.updateInputWindowsLw();
- }
- ......
- }
- ......
- }
Step 5.InputMonitor.updateInputWindowsLw
иҝҷдёӘеҮҪж•°е®ҡд№үеңЁframeworks/base/services/java/com/android/server/WindowManagerService.javaж–Ү件дёӯпјҡ
- publicclassWindowManagerServiceextendsIWindowManager.Stub
- implementsWatchdog.Monitor{
- ......
- finalclassInputMonitor{
- ......
- /*Updatesthecachedwindowinformationprovidedtotheinputdispatcher.*/
- publicvoidupdateInputWindowsLw(){
- //Populatetheinputwindowlistwithinformationaboutallofthewindowsthat
- //couldpotentiallyreceiveinput.
- //Asanoptimization,wecouldtrytoprunethelistofwindowsbutthisturns
- //outtobedifficultbecauseonlythenativecodeknowsforsurewhichwindow
- //currentlyhastouchfocus.
- finalArrayList<WindowState>windows=mWindows;
- finalintN=windows.size();
- for(inti=N-1;i>=0;i--){
- finalWindowStatechild=windows.get(i);
- if(child.mInputChannel==null||child.mRemoved){
- //Skipthiswindowbecauseitcannotpossiblyreceiveinput.
- continue;
- }
- ......
- //Addawindowtoourlistofinputwindows.
- finalInputWindowinputWindow=mTempInputWindows.add();
- ......
- }
- //Sendwindowstonativecode.
- mInputManager.setInputWindows(mTempInputWindows.toNullTerminatedArray());
- ......
- }
- ......
- }
- ......
- }
Step 6.InputManager.setInputWindows
иҝҷдёӘеҮҪж•°е®ҡд№үеңЁframeworks/base/services/java/com/android/server/InputManager.javaж–Ү件дёӯпјҡ
- publicclassInputManager{
- ......
- publicvoidsetInputWindows(InputWindow[]windows){
- nativeSetInputWindows(windows);
- }
- ......
- }
Step 7.InputManager.nativeSetInputWindows
иҝҷдёӘеҮҪж•°е®ҡд№үеңЁframeworks/base/services/jni/com_android_server_InputManager.cppж–Ү件дёӯпјҡ
- staticvoidandroid_server_InputManager_nativeSetInputWindows(JNIEnv*env,jclassclazz,
- jobjectArraywindowObjArray){
- if(checkInputManagerUnitialized(env)){
- return;
- }
- gNativeInputManager->setInputWindows(env,windowObjArray);
- }
Step 8.NativeInputManager.setInputWindows
иҝҷдёӘеҮҪж•°е®ҡд№үеңЁframeworks/base/services/jni/com_android_server_InputManager.cppж–Ү件дёӯпјҡ
- voidNativeInputManager::setInputWindows(JNIEnv*env,jobjectArraywindowObjArray){
- Vector<InputWindow>windows;
- jsizelength=env->GetArrayLength(windowObjArray);
- for(jsizei=0;i<length;i++){
- jobjectinputTargetObj=env->GetObjectArrayElement(windowObjArray,i);
- if(!inputTargetObj){
- break;//foundnullelementindicatingendofusedportionofthearray
- }
- windows.push();
- InputWindow&window=windows.editTop();
- boolvalid=populateWindow(env,inputTargetObj,window);
- if(!valid){
- windows.pop();
- }
- env->DeleteLocalRef(inputTargetObj);
- }
- mInputManager->getDispatcher()->setInputWindows(windows);
- }
Step 9. InputDispatcher.setInputWindows
иҝҷдёӘеҮҪж•°е®ҡд№үеңЁframeworks/base/libs/ui/InputDispatcher.cppж–Ү件дёӯпјҡ
- voidInputDispatcher::setInputWindows(constVector<InputWindow>&inputWindows){
- ......
- {//acquirelock
- AutoMutex_l(mLock);
- //Clearoldwindowpointers.
- sp<InputChannel>oldFocusedWindowChannel;
- if(mFocusedWindow){
- oldFocusedWindowChannel=mFocusedWindow->inputChannel;
- mFocusedWindow=NULL;
- }
- mWindows.clear();
- //Loopovernewwindowsandrebuildthenecessarywindowpointersfor
- //trackingfocusandtouch.
- mWindows.appendVector(inputWindows);
- size_tnumWindows=mWindows.size();
- for(size_ti=0;i<numWindows;i++){
- constInputWindow*window=&mWindows.itemAt(i);
- if(window->hasFocus){
- mFocusedWindow=window;
- break;
- }
- }
- ......
- }//releaselock
- ......
- }
иҝҷж ·пјҢInputManagerе°ұжҠҠеҪ“еүҚжҝҖжҙ»зҡ„ActivityзӘ—еҸЈдҝқеӯҳеңЁInputDispatcherдёӯдәҶпјҢеҗҺйқўе°ұеҸҜд»ҘжҠҠй”®зӣҳж¶ҲжҒҜеҲҶеҸ‘з»ҷе®ғжқҘеӨ„зҗҶгҖӮ
еӣһеҲ°Step 1дёӯзҡ„ViewRoot.setViewеҮҪж•°дёӯпјҢжҺҘдёӢжқҘе°ұи°ғз”ЁдёӢйқўиҜӯеҸҘжқҘжіЁеҶҢй”®зӣҳж¶ҲжҒҜжҺҘ收йҖҡйҒ“зҡ„дёҖз«ҜеҲ°InputManagerдёӯеҺ»пјҡ
- mInputChannel=newInputChannel();
- try{
- res=sWindowSession.add(mWindow,mWindowAttributes,
- getHostVisibility(),mAttachInfo.mContentInsets,
- mInputChannel);
- }catch(RemoteExceptione){
- ......
- }finally{
- ......
- }
Step 10.WindowManagerService.Session.add
иҝҷдёӘеҮҪж•°е®ҡд№үеңЁframeworks/base/services/java/com/android/server/WindowManagerService.javaж–Ү件дёӯпјҡ
- publicclassWindowManagerServiceextendsIWindowManager.Stub
- implementsWatchdog.Monitor{
- ......
- privatefinalclassSessionextendsIWindowSession.Stub
- implementsIBinder.DeathRecipient{
- ......
- publicintadd(IWindowwindow,WindowManager.LayoutParamsattrs,
- intviewVisibility,RectoutContentInsets,InputChanneloutInputChannel){
- returnaddWindow(this,window,attrs,viewVisibility,outContentInsets,
- outInputChannel);
- }
- ......
- }
- ......
- }
Step 11.WindowManagerService.addWindow
иҝҷдёӘеҮҪж•°е®ҡд№үеңЁframeworks/base/services/java/com/android/server/WindowManagerService.javaж–Ү件дёӯпјҡ
- publicclassWindowManagerServiceextendsIWindowManager.Stub
- implementsWatchdog.Monitor{
- ......
- publicintaddWindow(Sessionsession,IWindowclient,
- WindowManager.LayoutParamsattrs,intviewVisibility,
- RectoutContentInsets,InputChanneloutInputChannel){
- ......
- WindowStatewin=null;
- synchronized(mWindowMap){
- ......
- win=newWindowState(session,client,token,
- attachedWindow,attrs,viewVisibility);
- ......
- if(outInputChannel!=null){
- Stringname=win.makeInputChannelName();
- InputChannel[]inputChannels=InputChannel.openInputChannelPair(name);
- win.mInputChannel=inputChannels[0];
- inputChannels[1].transferToBinderOutParameter(outInputChannel);
- mInputManager.registerInputChannel(win.mInputChannel);
- }
- ......
- }
- ......
- }
- ......
- }
иҝҷйҮҢзҡ„outInputChannelеҚідёәеүҚйқўеңЁStep 1дёӯеҲӣе»әзҡ„InputChannelпјҢе®ғдёҚдёәNULLпјҢеӣ жӯӨпјҢиҝҷйҮҢдјҡйҖҡиҝҮInputChannel.openInputChannelPairеҮҪж•°жқҘеҲӣе»әдёҖеҜ№иҫ“е…ҘйҖҡйҒ“пјҢе…¶дёӯдёҖдёӘдҪҚдәҺWindowManagerServiceдёӯпјҢеҸҰеӨ–дёҖдёӘйҖҡиҝҮoutInputChannelеҸӮж•°иҝ”еӣһеҲ°еә”з”ЁзЁӢеәҸдёӯпјҡ
- inputChannels[1].transferToBinderOutParameter(outInputChannel);
еҲӣе»әиҫ“е…ҘйҖҡйҒ“д№ӢеүҚпјҢWindowManagerServiceдјҡдёәеҪ“еүҚActivityзӘ—еҸЈеҲӣе»әдёҖдёӘWindowStateеҜ№иұЎwinпјҢз”ЁжқҘи®°еҪ•иҝҷдёӘActivityзӘ—еҸЈзҡ„зҠ¶жҖҒдҝЎжҒҜгҖӮеҪ“еҲӣе»әиҝҷеҜ№иҫ“е…Ҙз®ЎйҒ“жҲҗеҠҹд»ҘеҗҺпјҢд№ҹдјҡжҠҠе…¶дёӯзҡ„дёҖдёӘз®ЎйҒ“дҝқеӯҳеңЁиҝҷдёӘWindowStateеҜ№иұЎwinзҡ„жҲҗе‘ҳеҸҳйҮҸmInputChannelдёӯпјҢеҗҺйқўиҰҒжіЁй”ҖиҝҷдёӘз®ЎйҒ“зҡ„ж—¶еҖҷпјҢе°ұжҳҜд»ҺиҝҷдёӘWindownStateеҜ№иұЎдёӯеҸ–еӣһиҝҷдёӘз®ЎйҒ“зҡ„пјҡ
- win.mInputChannel=inputChannels[0];
жҺҘдёӢжқҘжҲ‘们е°ұзңӢдёҖдёӢInputChannel.openInputChannelPairеҮҪж•°зҡ„е®һзҺ°гҖӮ
Step 12.InputChannel.openInputChannelPair
иҝҷдёӘеҮҪж•°е®ҡд№үеңЁframeworks/base/core/java/android/view/InputChannel.javaж–Ү件дёӯпјҡ
- publicfinalclassInputChannelimplementsParcelable{
- ......
- /**
- *Createsanewinputchannelpair.Onechannelshouldbeprovidedtotheinput
- *dispatcherandtheothertotheapplication'sinputqueue.
- *@paramnameThedescriptive(non-unique)nameofthechannelpair.
- *@returnApairofinputchannels.Theyaresymmetricandindistinguishable.
- */
- publicstaticInputChannel[]openInputChannelPair(Stringname){
- ......
- returnnativeOpenInputChannelPair(name);
- }
- ......
- }
Step 13.InputChannel.nativeOpenInputChannelPair
иҝҷдёӘеҮҪж•°е®ҡд№үеңЁframeworks/base/core/jni/android_view_InputChannel.cppж–Ү件дёӯпјҡ
- staticjobjectArrayandroid_view_InputChannel_nativeOpenInputChannelPair(JNIEnv*env,
- jclassclazz,jstringnameObj){
- constchar*nameChars=env->GetStringUTFChars(nameObj,NULL);
- String8name(nameChars);
- env->ReleaseStringUTFChars(nameObj,nameChars);
- sp<InputChannel>serverChannel;
- sp<InputChannel>clientChannel;
- status_tresult=InputChannel::openInputChannelPair(name,serverChannel,clientChannel);
- if(result){
- LOGE("Couldnotopeninputchannelpair.status=%d",result);
- jniThrowRuntimeException(env,"Couldnotopeninputchannelpair.");
- returnNULL;
- }
- //TODOmorerobusterrorchecking
- jobjectserverChannelObj=android_view_InputChannel_createInputChannel(env,
- newNativeInputChannel(serverChannel));
- jobjectclientChannelObj=android_view_InputChannel_createInputChannel(env,
- newNativeInputChannel(clientChannel));
- jobjectArraychannelPair=env->NewObjectArray(2,gInputChannelClassInfo.clazz,NULL);
- env->SetObjectArrayElement(channelPair,0,serverChannelObj);
- env->SetObjectArrayElement(channelPair,1,clientChannelObj);
- returnchannelPair;
- }
Step 14.InputChannel.openInputChannelPair
иҝҷдёӘеҮҪж•°е®ҡд№үеңЁframeworks/base/libs/ui/InputTransport.cppж–Ү件дёӯпјҡ
- status_tInputChannel::openInputChannelPair(constString8&name,
- sp<InputChannel>&outServerChannel,sp<InputChannel>&outClientChannel){
- status_tresult;
- intserverAshmemFd=ashmem_create_region(name.string(),DEFAULT_MESSAGE_BUFFER_SIZE);
- if(serverAshmemFd<0){
- ......
- }else{
- result=ashmem_set_prot_region(serverAshmemFd,PROT_READ|PROT_WRITE);
- if(result<0){
- ......
- }else{
- //Dupthefiledescriptorbecausetheserverandclientinputchannelobjectsthat
- //arereturnedmayhavedifferentlifetimesbuttheysharethesamesharedmemoryregion.
- intclientAshmemFd;
- clientAshmemFd=dup(serverAshmemFd);
- if(clientAshmemFd<0){
- ......
- }else{
- intforward[2];
- if(pipe(forward)){
- ......
- }else{
- intreverse[2];
- if(pipe(reverse)){
- ......
- }else{
- String8serverChannelName=name;
- serverChannelName.append("(server)");
- outServerChannel=newInputChannel(serverChannelName,
- serverAshmemFd,reverse[0],forward[1]);
- String8clientChannelName=name;
- clientChannelName.append("(client)");
- outClientChannel=newInputChannel(clientChannelName,
- clientAshmemFd,forward[0],reverse[1]);
- returnOK;
- }
- ......
- }
- ......
- }
- }
- }
- ......
- }
- InputChannel::InputChannel(constString8&name,int32_tashmemFd,int32_treceivePipeFd,
- int32_tsendPipeFd):
- mName(name),mAshmemFd(ashmemFd),mReceivePipeFd(receivePipeFd),mSendPipeFd(sendPipeFd){
- ......
- }
е…·дҪ“жқҘиҜҙпјҢServerз«Ҝе’ҢClientз«Ҝзҡ„InputChannelеҲҶеҲ«жҳҜиҝҷж ·жһ„жҲҗзҡ„пјҡ
Server Input Channel: ashmem - reverse(read) - forward(write)
Client Input Channel: ashmem - forward(read) - reverse(write)
еүҚйқўжҲ‘们еңЁAndroidеә”з”ЁзЁӢеәҸж¶ҲжҒҜеӨ„зҗҶжңәеҲ¶пјҲLooperгҖҒHandlerпјүеҲҶжһҗдёҖж–ҮдёӯеӯҰд№ Androidеә”з”ЁзЁӢеәҸзҡ„ж¶ҲжҒҜеӨ„зҗҶжңәеҲ¶ж—¶зҹҘйҒ“пјҢз®ЎйҒ“еҸҜд»Ҙз”ЁдҪңиҝӣзЁӢй—ҙйҖҡдҝЎпјҢе…¶дёӯдёҖдёӘиҝӣзЁӢеңЁз®ЎйҒ“зҡ„иҜ»з«Ҝзӯүеҫ…ж–°зҡ„еҶ…з©әеҸҜиҜ»пјҢеҸҰдёҖдёӘиҝӣзЁӢеңЁз®ЎйҒ“зҡ„еҶҷз«ҜеҶҷе…Ҙж–°зҡ„еҶ…е®№д»Ҙе”ӨйҶ’еңЁз®ЎйҒ“иҜ»з«Ҝзӯүеҫ…зҡ„иҝӣзЁӢпјҢиҝҷж ·е°ұе®һзҺ°дәҶиҝӣзЁӢй—ҙйҖҡдҝЎгҖӮеңЁжҲ‘们иҝҷдёӘжғ…жҷҜдёӯпјҢClientз«ҜеҸҜд»ҘеңЁеүҚеҗ‘з®ЎйҒ“пјҲforward
pipeпјүзҡ„иҜ»з«ҜзқЎзң зӯүеҫ…ж–°зҡ„еҶ…е®№еҸҜиҜ»пјҢиҖҢServerз«ҜеҸҜд»ҘйҖҡиҝҮеҗ‘еүҚеҗ‘з®ЎйҒ“пјҲforward pipeпјүзҡ„еҶҷз«ҜеҶҷе…Ҙж–°зҡ„еҶ…е®№жқҘе”ӨйҶ’Clientз«ҜпјҢеҗҢж ·пјҢжҠҠеүҚеҗ‘з®ЎйҒ“пјҲforward pipeпјүжҚўжҲҗеҸҚеҗ‘з®ЎйҒ“пјҲreverse pipeпјүпјҢд№ҹиғҪе®һзҺ°Clientз«Ҝе”ӨйҶ’Serverз«ҜгҖӮеңЁеҗҺйқўжҲ‘们еҲҶжһҗInputDispatcherеҲҶеҸ‘й”®зӣҳж¶ҲжҒҜж—¶пјҢдјҡзңӢеҲ°е®ғ们зҡ„з”Ёжі•гҖӮ
жңүдәҶиҝҷдәӣиғҢжҷҜзҹҘиҜҶеҗҺпјҢзӣёдҝЎдёҠйқўзҡ„openInputChannelPairзҡ„д»Јз Ғе°ұе®№жҳ“зҗҶи§ЈдәҶпјҢиҝҷйҮҢе°ұдёҚеҶҚиҜҰиҝ°дәҶгҖӮ
еҲӣе»әеҘҪдәҶиҝҷдёӨдёӘиҫ“е…ҘйҖҡйҒ“еҗҺпјҢеӣһеҲ°Step 11дёӯзҡ„WindowManagerService.addWindowеҮҪж•°дёӯпјҢдёҖж–№йқўе®ғжҠҠеҲҡжүҚеҲӣе»әзҡ„Clientз«Ҝзҡ„иҫ“е…ҘйҖҡйҒ“йҖҡиҝҮoutInputChannelеҸӮж•°иҝ”еӣһеҲ°еә”з”ЁзЁӢеәҸдёӯпјҡ
- inputChannels[1].transferToBinderOutParameter(outInputChannel);
еҸҰдёҖж–№йқўпјҢе®ғиҝҳиҰҒжҠҠеҲҡжүҚеҲӣе»әзҡ„Serverз«Ҝзҡ„иҫ“е…ҘйҖҡйҒ“жіЁеҶҢеҲ°InputManagerдёӯпјҡ
- mInputManager.registerInputChannel(win.mInputChannel);
иҝҷдёӘеҮҪж•°е®ҡд№үеңЁframeworks/base/services/java/com/android/server/InputManager.javaж–Ү件дёӯпјҡ
- publicclassInputManager{
- ......
- /**
- *Registersaninputchannelsothatitcanbeusedasaninputeventtarget.
- *@paraminputChannelTheinputchanneltoregister.
- */
- publicvoidregisterInputChannel(InputChannelinputChannel){
- if(inputChannel==null){
- thrownewIllegalArgumentException("inputChannelmustnotbenull.");
- }
- nativeRegisterInputChannel(inputChannel,false);
- }
- ......
- }
Step 16.InputManager.nativeRegisterInputChannel
иҝҷдёӘеҮҪж•°е®ҡд№үеңЁframeworks/base/services/jni/com_android_server_InputManager.cpp ж–Ү件дёӯпјҡ
- staticvoidandroid_server_InputManager_nativeRegisterInputChannel(JNIEnv*env,jclassclazz,
- jobjectinputChannelObj,jbooleanmonitor){
- ......
- sp<InputChannel>inputChannel=android_view_InputChannel_getInputChannel(env,
- inputChannelObj);
- ......
- status_tstatus=gNativeInputManager->registerInputChannel(
- env,inputChannel,inputChannelObj,monitor);
- ......
- }
Step 17. NativeInputManager.registerInputChannel
иҝҷдёӘеҮҪж•°е®ҡд№үеңЁframeworks/base/services/jni/com_android_server_InputManager.cpp ж–Ү件дёӯпјҡ
- status_tNativeInputManager::registerInputChannel(JNIEnv*env,
- constsp<InputChannel>&inputChannel,jobjectinputChannelObj,boolmonitor){
- ......
- status=mInputManager->getDispatcher()->registerInputChannel(inputChannel,monitor);
- ......
- }
Step 18.InputDispatcher.registerInputChannel
иҝҷдёӘеҮҪж•°е®ҡд№үеңЁframeworks/base/libs/ui/InputDispatcher.cppж–Ү件дёӯпјҡ
- status_tInputDispatcher::registerInputChannel(constsp<InputChannel>&inputChannel,boolmonitor){
- ......
- {//acquirelock
- AutoMutex_l(mLock);
- if(getConnectionIndexLocked(inputChannel)>=0){
- LOGW("Attemptedtoregisteralreadyregisteredinputchannel'%s'",
- inputChannel->getName().string());
- returnBAD_VALUE;
- }
- sp<Connection>connection=newConnection(inputChannel);
- status_tstatus=connection->initialize();
- if(status){
- LOGE("Failedtoinitializeinputpublisherforinputchannel'%s',status=%d",
- inputChannel->getName().string(),status);
- returnstatus;
- }
- int32_treceiveFd=inputChannel->getReceivePipeFd();
- mConnectionsByReceiveFd.add(receiveFd,connection);
- if(monitor){
- mMonitoringChannels.push(inputChannel);
- }
- mLooper->addFd(receiveFd,0,ALOOPER_EVENT_INPUT,handleReceiveCallback,this);
- runCommandsLockedInterruptible();
- }//releaselock
- returnOK;
- }
йҒ“зҡ„иҜ»з«ҜжҸҸиҝ°з¬ҰгҖӮеӣһеҝҶдёҖдёӢStep 14дёӯзҡ„InputChannel.openInputChannelPairеҮҪж•°пјҢжҲ‘们еҲӣе»әдәҶдёҖдёӘServerз«Ҝзҡ„InputChannelпјҢе°ұжҳҜеҜ№еә”иҝҷйҮҢзҡ„inputChannelдәҶпјҢиҝҷдёӘinputChannelзҡ„Receive Pipe Fdе°ұжҳҜжҲ‘们еүҚйқўиҜҙзҡ„еҸҚеҗ‘з®ЎйҒ“зҡ„иҜ»з«ҜжҸҸиҝ°з¬ҰдәҶгҖӮжңүдәҶиҝҷдёӘReceive Pipe FdеҗҺпјҢе°ұд»Ҙе®ғдҪңдёәKeyеҖјжқҘжҠҠеүҚйқўеҲӣе»әзҡ„ConnectionеҜ№иұЎдҝқеӯҳеңЁInputDispatcherдёӯпјҢиҝҷж ·е°ұеҹәжң¬е®ҢжҲҗй”®зӣҳж¶ҲжҒҜжҺҘ收йҖҡйҒ“зҡ„жіЁеҶҢдәҶгҖӮдҪҶжҳҜпјҢжіЁеҶҢзҡ„е·ҘдҪңиҝҳжңӘе®ҢжҲҗпјҢжңҖеҗҺпјҢиҝҳиҰҒжҠҠиҝҷдёӘReceive Pipe Fdж·»еҠ еҲ°InputDispatcherзҡ„жҲҗе‘ҳеҸҳйҮҸmLooperдёӯеҺ»пјҢиҝҷйҮҢзҡ„жҲҗе‘ҳеҸҳйҮҸmLooperзҡ„зұ»еһӢдёәLooperпјҢжҲ‘们еңЁеүҚйқўд»Ӣз»ҚInputManagerзҡ„еҗҜеҠЁиҝҮзЁӢзҡ„Step 15дёӯе·Із»Ҹи§ҒиҝҮдәҶпјҢиҝҷйҮҢе°ұдёҚеҶҚиҜҰиҝ°дәҶпјҢдёҚиҝҮиҝҷйҮҢд»Қ然еҖјеҫ—д»Ӣз»ҚдёҖдёӢе®ғзҡ„addFdеҮҪж•°гҖӮ
еңЁеүҚйқўдёҖзҜҮж–Үз« Androidеә”з”ЁзЁӢеәҸж¶ҲжҒҜеӨ„зҗҶжңәеҲ¶пјҲLooperгҖҒHandlerпјүеҲҶжһҗдёӯпјҢжҲ‘们еңЁд»Ӣз»ҚеҲ°Androidеә”з”ЁзЁӢеәҸзҡ„ж¶ҲжҒҜеҫӘзҺҜдёҖиҠӮж—¶пјҢжӣҫз»ҸиҜҙиҝҮпјҢеңЁLooperзұ»еҶ…йғЁпјҢдјҡеҲӣе»әдёҖдёӘз®ЎйҒ“пјҢ然еҗҺLooperдјҡзқЎзң еңЁиҝҷдёӘз®ЎйҒ“зҡ„иҜ»з«ҜпјҢзӯүеҫ…еҸҰеӨ–дёҖдёӘзәҝзЁӢжқҘеҫҖиҝҷдёӘз®ЎйҒ“зҡ„еҶҷз«ҜеҶҷе…Ҙж–°зҡ„еҶ…е®№пјҢд»ҺиҖҢе”ӨйҶ’зӯүеҫ…еңЁиҝҷдёӘз®ЎйҒ“иҜ»з«Ҝзҡ„зәҝзЁӢпјҢйҷӨжӯӨд№ӢеӨ–пјҢLooperиҝҳеҸҜд»ҘеҗҢж—¶зқЎзң зӯүеҫ…еңЁе…¶е®ғзҡ„ж–Ү件жҸҸиҝ°з¬ҰдёҠпјҢеӣ дёәе®ғжҳҜйҖҡиҝҮLinuxзі»з»ҹзҡ„epollжңәеҲ¶жқҘжү№йҮҸзӯүеҫ…жҢҮе®ҡзҡ„ж–Ү件жңүж–°зҡ„еҶ…е®№еҸҜиҜ»зҡ„гҖӮиҝҷдәӣе…¶е®ғзҡ„ж–Ү件жҸҸиҝ°з¬Ұе°ұжҳҜйҖҡиҝҮLooperзұ»зҡ„addFdжҲҗеҮҪж•°ж·»еҠ иҝӣеҺ»зҡ„дәҶпјҢеңЁж·»еҠ зҡ„ж—¶еҖҷпјҢиҝҳеҸҜд»ҘжҢҮе®ҡеӣһи°ғеҮҪж•°пјҢеҚіеҪ“иҝҷдёӘж–Ү件жҸҸиҝ°з¬ҰжүҖжҢҮеҗ‘зҡ„ж–Ү件жңүж–°зҡ„еҶ…е®№еҸҜиҜ»ж—¶пјҢLooperе°ұдјҡи°ғз”ЁиҝҷдёӘhanldeReceiveCallbackеҮҪж•°пјҢжңүе…ҙи¶Јзҡ„иҜ»иҖ…еҸҜд»ҘиҮӘе·ұз ”з©¶дёҖдёӢLooperзұ»зҡ„addFdеҮҪж•°зҡ„е®һзҺ°пјҢе®ғдҪҚдәҺframeworks/base/libs/utils/Looper.cppж–Ү件дёӯгҖӮ
еҲҶжһҗеҲ°иҝҷйҮҢпјҢServerз«Ҝзҡ„InputChannelе°ұжіЁеҶҢе®ҢжҲҗдәҶгҖӮеӣһеҝҶдёҖдёӢеүҚйқўд»Ӣз»ҚInputManagerеҗҜеҠЁиҝҮзЁӢзҡ„Step 14пјҢиҝҷж—¶InputDispatcherThreadеҗҢж—¶зқЎзң еңЁInputDispatcherзҡ„жҲҗе‘ҳеҸҳйҮҸmLooperеҶ…йғЁзҡ„з®ЎйҒ“зҡ„иҜ»з«Ҝд»ҘеҸҠиҝҷйҮҢзҡ„Serverз«ҜInputChannelйҮҢйқўзҡ„еҸҚеҗ‘з®ЎйҒ“зҡ„иҜ»з«ҜдёҠпјҢmLooperеҶ…йғЁзҡ„з®ЎйҒ“зҡ„иҜ»з«Ҝзӯүеҫ…й”®зӣҳдәӢ件зҡ„еҸ‘з”ҹиҖҢиў«е”ӨйҶ’пјҢиҖҢServerз«ҜInputChannelйҮҢйқўзҡ„еҸҚеҗ‘з®ЎйҒ“зҡ„иҜ»з«Ҝзӯүеҫ…Clientз«ҜInputChannelйҮҢйқўзҡ„еҸҚеҗ‘з®ЎйҒ“зҡ„еҶҷз«Ҝиў«еҶҷе…Ҙж–°зҡ„еҶ…е®№иҖҢиў«е”ӨйҶ’гҖӮ
Serverз«Ҝзҡ„InputChannelжіЁеҶҢе®ҢжҲҗеҗҺпјҢеӣһеҲ°Step 11дёӯзҡ„WindowManagerService.addWindowеҮҪж•°пјҢжҺҘдёӢжқҘе°ұжҳҜжҠҠClientз«Ҝзҡ„InputChannelиҪ¬жҚўжҲҗaddWindowзҡ„еҸӮж•°outInputChannelдёӯпјҢ然еҗҺиҝ”еӣһеҲ°Step 1дёӯзҡ„ViewRoot.setViewеҮҪж•°дёӯпјҢ继з»ӯжү§иЎҢClientз«Ҝзҡ„InputChannelзҡ„жіЁеҶҢиҝҮзЁӢпјҢеҚідёәеә”з”ЁзЁӢеәҸиҝҷдёҖдҫ§жіЁеҶҢй”®зӣҳж¶ҲжҒҜжҺҘ收йҖҡйҒ“пјҡ
- if(viewinstanceofRootViewSurfaceTaker){
- mInputQueueCallback=
- ((RootViewSurfaceTaker)view).willYouTakeTheInputQueue();
- }
- if(mInputQueueCallback!=null){
- mInputQueue=newInputQueue(mInputChannel);
- mInputQueueCallback.onInputQueueCreated(mInputQueue);
- }else{
- InputQueue.registerInputChannel(mInputChannel,mInputHandler,
- Looper.myQueue());
- }
иҝҷйҮҢзҡ„еҸҳйҮҸviewдёҖиҲ¬дёҚдёәRootViewSurfaceTakerзҡ„е®һдҫӢпјҢеӣ жӯӨпјҢжңҖеҗҺдјҡжү§иЎҢдёӢйқўиҜӯеҸҘпјҡ
- InputQueue.registerInputChannel(mInputChannel,mInputHandler,
- Looper.myQueue());
Step 19. InputQueue.registerInputChannel
иҝҷдёӘеҮҪж•°е®ҡд№үеңЁframeworks/base/core/java/android/view/InputQueue.javaж–Ү件дёӯпјҡ
- publicfinalclassInputQueue{
- ......
- publicstaticvoidregisterInputChannel(InputChannelinputChannel,InputHandlerinputHandler,
- MessageQueuemessageQueue){
- ......
- synchronized(sLock){
- ......
- nativeRegisterInputChannel(inputChannel,inputHandler,messageQueue);
- }
- }
- ......
- }
Step 20.InputQueue.nativeRegisterInputChannel
иҝҷдёӘеҮҪж•°е®ҡд№үеңЁframeworks/base/core/jni/android_view_InputQueue.cppж–Ү件дёӯпјҡ
- staticvoidandroid_view_InputQueue_nativeRegisterInputChannel(JNIEnv*env,jclassclazz,
- jobjectinputChannelObj,jobjectinputHandlerObj,jobjectmessageQueueObj){
- status_tstatus=gNativeInputQueue.registerInputChannel(
- env,inputChannelObj,inputHandlerObj,messageQueueObj);
- ......
- }
Step 21. NativeInputQueue.registerInputChannel
иҝҷдёӘеҮҪж•°е®ҡд№үеңЁframeworks/base/core/jni/android_view_InputQueue.cppж–Ү件дёӯпјҡ
- status_tNativeInputQueue::registerInputChannel(JNIEnv*env,jobjectinputChannelObj,
- jobjectinputHandlerObj,jobjectmessageQueueObj){
- sp<InputChannel>inputChannel=android_view_InputChannel_getInputChannel(env,
- inputChannelObj);
- ......
- sp<Looper>looper=android_os_MessageQueue_getLooper(env,messageQueueObj);
- {//acquirelock
- AutoMutex_l(mLock);
- if(getConnectionIndex(inputChannel)>=0){
- LOGW("Attemptedtoregisteralreadyregisteredinputchannel'%s'",
- inputChannel->getName().string());
- returnBAD_VALUE;
- }
- uint16_tconnectionId=mNextConnectionId++;
- sp<Connection>connection=newConnection(connectionId,inputChannel,looper);
- status_tresult=connection->inputConsumer.initialize();
- if(result){
- LOGW("Failedtoinitializeinputconsumerforinputchannel'%s',status=%d",
- inputChannel->getName().string(),result);
- returnresult;
- }
- connection->inputHandlerObjGlobal=env->NewGlobalRef(inputHandlerObj);
- int32_treceiveFd=inputChannel->getReceivePipeFd();
- mConnectionsByReceiveFd.add(receiveFd,connection);
- looper->addFd(receiveFd,0,ALOOPER_EVENT_INPUT,handleReceiveCallback,this);
- }//releaselock
- ......
- returnOK;
- }
д»Ӣз»ҚеҲ°иҝҷйҮҢпјҢеә”з”ЁзЁӢеәҸжіЁеҶҢй”®зӣҳж¶ҲжҒҜжҺҘ收йҖҡйҒ“зҡ„иҝҮзЁӢе°ұеҲҶжһҗе®ҢжҲҗдәҶгҖӮиҝҷдёӘиҝҮзЁӢжҜ”иҫғеӨҚжқӮпјҢиҝҷйҮҢе°Ҹз»“дёҖдёӢпјҡ
A. еҚіе°Ҷдјҡиў«жҝҖжҙ»зҡ„ActivityзӘ—еҸЈпјҢдјҡйҖҡзҹҘInputManagerпјҢе®ғжҳҜеҪ“еүҚжҝҖжҙ»зҡ„зӘ—еҸЈпјҢеӣ жӯӨпјҢдёҖж—ҰеҸ‘з”ҹй”®зӣҳдәӢ件зҡ„ж—¶еҖҷпјҢInputManagerе°ұжҠҠиҝҷдёӘй”®зӣҳдәӢ件жҠӣз»ҷиҝҷдёӘActivityеӨ„зҗҶпјӣ
B. еә”з”ЁзЁӢеәҸдјҡдёәиҝҷдёӘActivityзӘ—еҸЈе’ҢInputManagerд№Ӣй—ҙеҲӣе»әдёҖдёӘй”®зӣҳж¶ҲжҒҜжҺҘ收йҖҡйҒ“пјҢиҝҷдёӘйҖҡйҒ“зҡ„дёҖз«Ҝз”ұдёҖдёӘServerз«Ҝзҡ„InputChannelжһ„жҲҗпјҢеҸҰдёҖз«Ҝз”ұClientз«Ҝзҡ„InputChannelжһ„жҲҗпјҢServerз«Ҝзҡ„InputChannelжіЁеҶҢеңЁз”ұInputManagerжүҖз®ЎзҗҶзҡ„InputDispatcherдёӯпјҢиҖҢClientз«Ҝзҡ„InputChannelжіЁеҶҢеңЁз”ұеә”з”ЁзЁӢеәҸдё»зәҝзЁӢзҡ„ж¶ҲжҒҜеҫӘзҺҜеҜ№иұЎLooperдёӯпјӣ
C. жіЁеҶҢеңЁInputDispatcherдёӯзҡ„InputChannelз”ұдёҖдёӘеҸҚеҗ‘з®ЎйҒ“зҡ„иҜ»з«Ҝе’ҢдёҖдёӘеүҚеҗ‘з®ЎйҒ“зҡ„еҶҷз«Ҝз»„жҲҗпјҢиҖҢжіЁеҶҢеңЁеә”з”ЁзЁӢеәҸдё»зәҝзЁӢзҡ„ж¶ҲжҒҜеҫӘзҺҜеҜ№иұЎLooperдёӯзҡ„InputChannelз”ұиҝҷдёӘеүҚеҗ‘з®ЎйҒ“зҡ„иҜ»з«Ҝе’ҢеҸҚеҗ‘з®ЎйҒ“зҡ„еҶҷз«Ҝз»„жҲҗпјҢиҝҷз§ҚдәӨеҸүз»“жһ„дҪҝеҫ—еҪ“жңүй”®зӣҳдәӢ件еҸ‘з”ҹж—¶пјҢInputDispatcherеҸҜд»ҘжҠҠиҝҷдёӘдәӢ件йҖҡзҹҘз»ҷеә”з”ЁзЁӢеәҸгҖӮ
еә”з”ЁзЁӢеәҸжіЁеҶҢеҘҪй”®зӣҳж¶ҲжҒҜжҺҘ收йҖҡйҒ“еҗҺпјҢжҺҘдёӢжқҘе°ұејҖе§ӢеҲҶжһҗInputManagerеҲҶеҸ‘й”®зӣҳж¶ҲжҒҜз»ҷеә”з”ЁзЁӢеәҸзҡ„иҝҮзЁӢдәҶгҖӮ
----
иҪ¬иҮӘпјҡиҖҒзҪ—зҡ„Androidеә”з”ЁзЁӢеәҸй”®зӣҳпјҲKeyboardпјүж¶ҲжҒҜеӨ„зҗҶжңәеҲ¶еҲҶжһҗ

- 2011-12-17 10:27
- жөҸи§Ҳ 1140
- иҜ„и®ә(0)
- жҹҘзңӢжӣҙеӨҡ
еҸ‘иЎЁиҜ„и®ә

зӣёе…іжҺЁиҚҗ
Androidеә”з”ЁзЁӢеәҸй”®зӣҳпјҲKeyboardпјүж¶ҲжҒҜеӨ„зҗҶжңәеҲ¶еҲҶжһҗ
иҜҰз»Ҷи®Іи§ЈдәҶAndroidеә”з”ЁзЁӢеәҸй”®зӣҳж¶ҲжҒҜеӨ„зҗҶжңәеҲ¶пјҢд»ҺJavaеұӮдёҖзӣҙеҲ°C++еұӮдёҺзі»з»ҹеҜ№жҺҘпјҢе…ЁйғЁж¶өзӣ–
дёҖдёӘзүӣдәәеҶҷзҡ„еҚҡе®ўпјҢиҷҪ然еҗҚдёәжө…и°ҲпјҢе®һйҷ…йқһеёёиҜҰе°Ҫ д»ҺжіЁеҶҢеҲ°дәӢ件дёҠдј йғҪжңүпјҢеӨҚеҲ¶дёӢжқҘз«ҹ然жңү... 收дёҖе…ғиҫӣиӢҰиҙ№пјҢжІЎз§ҜеҲҶзҡ„еҗҢеӯҰиҮӘе·ұзңӢеҚҡе®ўеҗ§пјҡ http://www.itivy.com/android/archive/2011/10/25/android-keyboard-message.html
emoji-keyboard, дёәAndroidеә”з”ЁзЁӢеәҸжҸҗдҫӣиЎЁжғ…з¬ҰеҸ·й”®зӣҳе®һзҺ°зҡ„еә“ AndroidиЎЁжғ…й”®зӣҳдёәAndroidеә”з”ЁзЁӢеәҸжҸҗдҫӣиЎЁжғ…з¬ҰеҸ·й”®зӣҳе®һзҺ°зҡ„еә“ Showcase еҝ«йҖҹе®үиЈ…dependencies { compile 'br.com.instachat:emoji-library
AndroidиҮӘе®ҡд№үиҪҜй”®зӣҳпјҢеңЁKeyboardзҡ„еҹәзЎҖдёҠзЁҚеҫ®дҝ®ж”№дәҶдёҖдёӢпјҢд»Һй”®зӣҳз„ҰзӮ№ж•ҲжһңеҲ°й”®зӣҳеёғеұҖпјҢйғҪжҳҜж–°йЈҺж јгҖӮ
Keyboard и§ЈеҶіandroidиЎЁжғ…й”®зӣҳй—ӘеҠЁй—®йўҳ
гҖҠжёёжҲҸй”®зӣҳ GameKeyboardгҖӢеҜ№е…Ёе®үеҚ“жёёжҲҸзҡ„иҷҡжӢҹй”®зӣҳйҖҶеҗ‘жҳ е°„еҲ°Xperia Playе®һдҪ“й”®зҡ„е®һзҺ°гҖӮеҸҜд»Ҙе®һзҺ°е®үеҚ“жёёжҲҸдёӯзҡ„иҷҡжӢҹй”®зӣҳжҳ е°„еҲ°е®һдҪ“й”®дёҠпјҢеҸҜд»Ҙзј–иҫ‘жҳ е°„зҡ„иҷҡжӢҹй”®дҪҚзҪ®пјҢдҪҝе…¶еҜ№дҪҚеңЁеұҸ幕зҡ„иҷҡжӢҹжҺ§еҲ¶й”®дёҠпјҢе®һдҪ“жҢүй’®жүҚиғҪдә§з”ҹ...
custom_keyboard android иҮӘе®ҡд№үй”®зӣҳ
Delphi XE ејҖеҸ‘AndroidиҷҡжӢҹй”®зӣҳ пјҢжәҗз Ғж–Ү件пјҡFMX.VirtualKeyboard.Android
иҝҷзҜҮж–Үз« жҳҜд»Ӣз»ҚAndroidдёӯиҮӘе®ҡд№үй”®зӣҳзҡ„дёҖдәӣеҘ—и·ҜпјҢйҖҡиҝҮе®ҡд№үдёҖдёӘж•°еӯ—й”®зӣҳдёәдҫӢпјҢжң¬зҜҮзҡ„ж–Үз« иҜӯиЁҖжҳҜеҹәдәҺKotlinе®һзҺ°зҡ„пјҢеҰӮжһңиҝҳжІЎжңүз”ЁжҲ–иҖ…дёҚзҶҹжӮүиҜҘиҜӯиЁҖзҡ„еҗҢеӯҰпјҢеҸҜд»ҘиҮӘе·ұиЎҘд№ пјҢжҲ‘д№ӢеүҚд№ҹеҶҷиҝҮе…Ҙй—Ёж–Үз« гҖӮ ж•Ҳжһңеӣҫ githubпјҡжәҗз Ғ...
keyboard-layout-editor, Webеә”з”ЁзЁӢеәҸе®һзҺ°й”®зӣҳеёғеұҖзҡ„&зј–иҫ‘ keyboard-layout-editorKeyboard-layout-editor.com жҳҜдёҖдёӘзҪ‘з»ңеә”з”ЁзЁӢеәҸпјҢеҸҜд»Ҙзј–иҫ‘й”®зӣҳеёғеұҖгҖӮжҚўеҸҘиҜқиҜҙпјҢгҖӮжҜҸдёӘзү©зҗҶй”®зҡ„дҪҚзҪ®е’ҢеӨ–и§ӮгҖӮеҲӣе»әиҝҷдёӘеә”з”ЁзЁӢеәҸзҡ„еҠЁжңә...
keyboard-dismisserдёҖдёӘе®һзҺ°зӮ№еҮ»д»»дҪ•й”®зӣҳеӨ–зҡ„йғЁеҲҶжқҘеҸ–ж¶Ҳй”®зӣҳзҡ„Androidеә“
android-xnumberkeyboard, Android number keyboard view. AndroidиҮӘе®ҡд№үзҡ„ж•°еӯ—й”®зӣҳгҖӮ
AndroidиҮӘе®ҡд№үиҪҜй”®зӣҳKeyboardView
AndroidиЎЁжғ…з¬ҰеҸ·й”®зӣҳдёҖдёӘдёәAndroidеә”з”ЁзЁӢеәҸжҸҗдҫӣиЎЁжғ…з¬ҰеҸ·й”®зӣҳе®һзҺ°зҡ„еә“ иҝҷжҳҜз”ұйЎ№зӣ®еҲӣе»әзҡ„гҖӮrepositories {...maven { url '...
Microchip keyboard firmwareй”®зӣҳеӣә件зЁӢеәҸ pic18fx
iPhone 5s Keyboard iOS 7iPhone 5s Keyboard iOS 7жҳҜдёҖж¬ҫй«ҳж•Ҳе®һз”Ёзҡ„еә”з”ЁзЁӢеәҸпјҢжҜҸдёҖдҪҚAndroidз”ЁжҲ·йғҪеҸҜд»ҘйҖҡиҝҮе®ғе°ҶиҮӘе·ұAndroidи®ҫеӨҮдёӯзҡ„й”®зӣҳжӣҝжҚўжҲҗдёәiPhone 5sзҡ„й”®зӣҳпјҢз®ҖеҚ•дҫҝжҚ·гҖӮ дҪ йңҖиҰҒжҝҖжҙ»и®ҫеӨҮдёӯзҡ„й”®зӣҳжүҚеҸҜд»ҘдҪҝз”Ёиҝҷ...
й”®зӣҳдҝ®еӨҚе·Ҙе…·KeyBoard KeyBoard
еҹәдәҺemWinзҡ„е…Ёй”®зӣҳжҺ§д»¶пјҢжҸҗдҫӣдёҖдёӘ480x272еӨ§е°Ҹзҡ„е®Ңж•ҙзӘ—еҸЈпјҢзӘ—еҸЈеҶ…еҢ…еҗ«ж ҮеҮҶй”®зӣҳеҸҠиҫ“е…ҘзӘ—еҸЈ
android иҮӘе®ҡд№үй”®зӣҳпјҢеңЁйЎөйқўеөҢе…Ҙзҡ„гҖӮдҪҝз”Ёиҝҳз®—з®ҖеҚ•